Tuesday, June 29, 2010

10 steps to the perfect under eye concealer application

Have you ever gotten an unexpected glimpse of yourself in the mirror and just been blown away by the lemur-like shadows under your eyes? That just happened to me recently when I was at the MAC store on Oak Street in Chicago.

I was testing MAC foundation shades, but when the SA handed me a mirror to see how well N2 matched my skin, all I saw was my hideous under-eye shadows.

They were purple. 

OK, maybe the store lighting wasn't helping (although seriously, MAC--if your lighting makes everyone look terrible, how is that helpful?) But I looked like Mortitia Addams. Or maybe Lurch.

So I've declared all-out war on my mauve eyelids and deep purple undereye circles.

I'm on the lookout for the best under eye concealer regimen ever. So far, this is what works best for me:

1. To plump up lines and allow the concealer to spread easily without caking, I apply my usual eye cream and let it sink in. If you use an eyeshadow primer, like Urban Decay Primer Potion, apply it next, before concealer. (But I find my concealer works great as a primer all by itself.)

2. If you can't remember which makeup to apply first, remember that in general, powder goes on top of liquid and creams, and more heavily pigmented cosmetics go on top of less. I wear tinted moisturizer or liquid foundation, so my liquid concealer goes on top of that--with powder, if any, going on top of it.

3. I use a mineral-based, highly pigmented tube concealer, like Maybelline Instant Age Rewind Under Eye Concealer
 or Revlon Age Defying Moisturizing Concealer


4. To pick the right shade, match your foundation or go a bit lighter--but not ridiculously so. You don't want to end up with light rings around your eyes. Also, keep the color wheel in mind. While I'm not going to tell you to wear a colored primer or anything that complicated, I find that if I pick a slightly-yellow-toned concealer, it does a better job of covering up purple shadows.

5. I squeeze the concealer onto the back of my left hand and work it into a Taklon concealer brush, like the Japonesque Taklon Synthetic Travel Concealer brush (#BP-910). In my experience, fingers, while great for applying foundation and blusher, melt my concealer and smudge it away even as I'm applying it. With foundation and blush, you want to blend blend blend, but concealer needs to be placed precisely, or it's not worth applying. On top of that, it's hard to work with the inner corners of the eye when my hand is in the way. Using a concealer brush allows me to get the pigment exactly where you want it.

6. Using the brush, I apply concealer over the inner third of the lower eyelid, and feather it towards the outer corner. You need to get the concealer up into the inner corner and against the side of the nose; that's where the darkest part of the shadow is. Don't get it too close to your tear ducts, or your eyes will water. And keep your concealer away from any lines you have.

7. Let it set, then blend the edges with your finger tip in a rolling motion. This is when you eradicate the demarcation between the concealer and the rest of your face.

8. If your eyelids have visible veins that make you look tired--and mine do, she complained in a wan, exhausted voice--apply concealer over the entire lid, from lashes to brows, applying it most heavily in the inner corners and across the lids where the veins show through, and feathering it away towards the outer edge of the eye area.

9. Let your concealer set while you do other makeup and move your face normally, then check for creases. Maybe apply a litte bit more where you're darkest.

10. Two excellent video tutorials are Kate Shepherd for Expert Village and Michelle Phan's.

Monday, June 28, 2010

Finally!--an Urban Decay palette for grown-ups.

Urban Decay makes some of the nicest eye shadows out there: the colors are gorgeous, and the texture is soft and blendable. I've loved them for years, and over the years, I somehow managed to accumulate a bunch of UD palettes.

It took a while, but I finally realized that Urban Decay eye shadows are too glittery and/or shimmery, and most of them aren't appropriate for a woman of a certain age. It also finally dawned on me that UD repackages the same colors in their palettes over and over again.

It was time for me to back away from the UD palettes. (Or buy them as presents for my daughter.)

But I just found out from The Best Things in Beauty that in July, Urban Decay will be releasing a new set of shadows in neutral shades. They look really gorgeous, and six of the twelve shades will be new!

The collection will include Sin, Naked, Sidecar (which formerly appeared in the Book of Shadows, Volume 1) Half Baked, Smog, and Toasted and the followed new shades:
  1. Virgin--Satin chamois
  2. Buck--Matte nutmeg
  3. Darkhorse--Bronze patina
  4. Hustle--Plum brown satin
  5. Creep--Onyx with gold sparkle
  6. Gunmetal--Gunmetal gray with silver glitter
The Naked palette will sell for $44 and will include a double-ended 24/7 pencil in Zero (black) and Whiskey (brown).

Thanks to The Best Things in Beauty's Charlestongirl and Tavia of Chic Profile for the head's up.

Sunday, June 27, 2010

Sunday afternoon click-a-thon (with random remarks as a GWP)


Want to smell like me? Or at least, Coach's notion of what a Poppy smells like? (Apparently we're fruity/floral--and hey, who isn't?) Beauty 411 has the 411.

The votes are tallied and the griege shoobooties won, so they are on their way to me from Zappos. Yes, I originally found them on Nordstrom, but the free two-way shipping won me over. After all, I'll probably try them on, wonder what I'd been smoking, and run over to the P.O. to return them.

Once I start thinking about a subject, I see it everywhere. And right now, I'm all about the neutral eyeshadow. So I was awfully pleased to see Jennifer Hudson's Got Milk ad. Check out her eye makeup--it looks fantastic. (Please to ignore the icky milk moustache, though.)

Anyone finding their concealer looking awfully pale these days? For now, I'm blending a dot of Giorgio Armani Fluid Sheer (shade #3, Golden Bronze) with my old faithful (and now discontinued) Maybelline Instant Age Rewind concealer--(and talk about combining high and low!) But what I really need to do is pop for a darker shade. I want to try the new Revlon ones.


I don't see as many ageless looks on The Sartorialist as I'd like. I'm often left feeling bereft. But this lovely brunette in a black top with a white collar has a great Coco Chanel-meets-Pierrot vibe.

In the time lapse between my writing a BlogHer post about serums and it going live, I dug around and found even more serums--like these two from from Phyto-C--that sound intriguing. But Vitamin C degrades when it's exposed to light, so I popped for a serum in a brown bottle. A budget-friendly one, at that. My bottle of nufountain C20 L-Ascorbic Vitamin C Serum arrived yesterday. I'll review it after I've been your guinea pig for a while.

Hey! College Fashion shows 25 summer sandals for any budget.

Finally, if you're fair-skinned, it can be really hard to find a bronzer that adds a little color but looks natural. Physician's Formula consistently comes out with colors that work for pale porcelain princesses like me. Right now I'm loving their Bamboo Wear Bamboo Silk Bronzer in Light.

With my usual high/low outlook, I'm applying my $9.95 bronzer with a $52 Nars bronzer brush. I load the brush with color, tap it off to remove the excess, and apply the bronzer in a sort of circular, rubbing motion over the areas that would get some sun: (that is, if I ever got up from my laptop) cheeks, nose, chin, forehead. It adds just a touch of color and a minimal amount of shimmer, and it's subtle enough to work in partnership with my blusher.

Finally, Une Femme has recommendations for summer weight scarves.

Click, read, enjoy!

Friday, June 25, 2010

While I tally votes, a skincare serum primer

I'm still tracking the voting on the totally excellent shooties I talked about yesterday ... just so you know, preliminary polls suggest that the greige shooties are winning by a landslide.

While I count votes, feel free to check out my latest BlogHer post--a description of what to look for in an anti-aging serum--along with some  products I recommend.

(I don't usually pimp my BlogHer posts, but this post went live on the down-low, so I'd appreciate it if you guys would head over, check it out, and leave comments about how I'm so great. Or leave comments about why your favorite serums are infinitely better than anything I mentioned--I'm not particular, just so long as Notice Is Taken.)

Thursday, June 24, 2010

I interrupt my eyeshadow thoughts to wonder about these summer booties

at Nordstrom.

They come in black

which I was totally going for!

But then I clicked on the gray ones.

Which somehow seem so much more summery.

Now, keep in mind that I don't really wear dress shoes all that frequently. Especially in summer, where I shout "hallelujah," pack away the high-heeled shoes and mostly dress like I've been crewing on a friend's yacht for a week. Plus let's not forget that I'm a size 14 and tend to dress conservatively. Talbots-y, even.

In other words, I don't usually rock high-cut sandal/boot hybrids with four-inch heels.

So which ones should I get--gray or black?

Monday, June 21, 2010

Eye shadow as contour: the theory

I'm probably getting really repetitive on the subject of neutral eyeshadow, but Sephora keeps filling my mailbox with catalogs showing models wearing truly outlandish colors--glittery turquoise stripes were featured in the latest--so it doesn't look as though I'll be shutting up any time soon.

So I'll say it again: neutral eye shadows are fantastic on women of a certain age. They do what eye shadow is supposed to do; shadow and sculpt the eyes to make them look bigger, brighter, and more expressive.

They do this by contouring the eye area. Now, it took me a long time to accept the fact that I was going to talk about using eye makeup to contour the eye area, because the old school notions of contouring seem hopelessly out of date.

You know what I mean when I talk about contouring the face with makeup, right? It's a makeup technique where you apply lighter makeup where you want a feature to appear higher or more prominent, and darker makeup where you want a feature to appear deeper or less prominent.

It's frequently used to make noses appear straighter and narrower, or make cheekbones look more prominent. But here's the thing about contouring: it's hard to make it look natural. It was first used in stage makeup, where the audience is very far away from the actors. Then it was used in black and white movies and stills, where you have dramatic lighting and a general aura of glamorous artificiality. But even then, makeup artists had to know what they were doing. Back then--and right now--when you shade and highlight an area, it's all about blending and soft, subtle shades.

As an example of what I'm talking about, take Marlene Dietrich. Her entire face was nothing but makeup and lighting. Here's a photograph of her standing next to Josef von Sternberg, the director who made her a star.


Notice the fairly flat planes of her face. Now look at her with von Sternberg's trademark lighting and a full face of contoured makeup:


I'm not a makeup artist, and I don't know how to do stage or film makeup, but it's pretty clear that Dietrich is wearing way more makeup than even the average Hollywood star of the 1930s--and they wore plenty.

Check out the contouring. I'm no expert, but I can see that a lighter shade of foundation is blended down the middle of her nose, with a darker shade along the side. In the first picture, it looks like she's wearing highlighter under her eyes, and in the second, it's obvious that the artist used rouge to contour her cheekbones (a trick that works very well in black and white photography, but is much less successful in color photographs or real life.)

Take at Dietrich's eye makeup. Her eyebrows are the stuff of legend, so we won't discuss them, except to warn you not to emulate her. Although tweezing her eyebrows off and drawing them on again much higher up did give Dietrich a much larger area in which to apply eyeshadow.

And what eyeshadow! She's wearing a medium shade from the lash line all the way up to the brows, with a lighter shade on the eyelid and a highlighting shade in the inner corner and in a narrow line under the eye. Her crease is shaded much darker. Her eyes are very wide set, and that, added to the increased height of her brow area, means the makeup artist could apply a ton of dark shadow in the U-shaped crease to the back wedge. Her eyes were big to begin with, but the eyeshadow makes them incredible.

And Dietrich was doing this before eyeshadow was commercially available. Instead, she or her makeup artist used soot mixed with baby oil or petroleum jelly.

There, now. Aren't you ashamed that you're not taking full advantage of the lovely, hygienic ready-made shades now available in stores?

Next on The Beauty Boomer: What I Do, or, I know Poppy Buxom, and she's no Marlene Dietrich.


Elsewhere on the web:

For more on makeup in films, see the article on makeup in Film Reference


For how to look more like Marlene Dietrich, go this article in Suite 101

Tuesday, June 15, 2010

What do you mean, women don't like using maps?

Hi internet! Listen, I know I've been neglecting you shamefully lately. But I have excuses. Many, in fact.

Mr. Buxom, also known as "Counselor Whup Ass" has been out of town
ruthlessly horsewhipping Intelletual Property scofflaws
at a trial, and I've been the only parent to help with my wonderful, talented children--children whose talents involve lots of driving around and listening to music and cramming for exams and shopping for camp clothes, not to mention the camps themselves. Plus the usual groceries, laundry, cooking, mopping up spills and teenaged angst and what not.

Then there's all that volunteer bullshit I'm always whining about (see tags) like my own talented musical performances and the desktop publishing I'm doing for a non-profit even as we speak. In fact, I'm only here because I'm waiting on some proofs.

But what has suffered? MY BLOG, thank you very much. And MY READERS.

Well, listen, readers--one of the things that has been vexing me has been my printer's inability to scan anything. I had all these pictures I wanted to show you, and the stupid HP All-in-one had become a Part-in-one. And then, a couple of weeks ago, it even balked at printing and morphed into the world's largest paperweight. So I did the smart thing. I checked out the reviews of the HP PhotoSmart C4280 All-In-One printer on Amazon. And I discovered that's it's not me; it's HP.

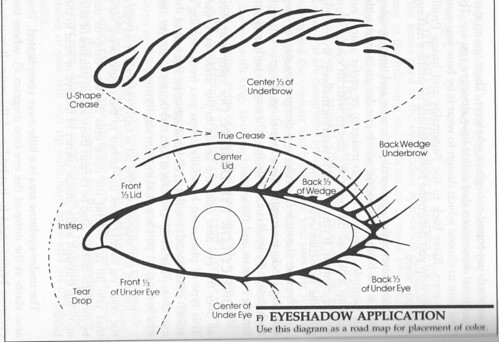
So I bought a new printer. And I just scanned my first scan! Voila:


Now, other than playing with the new printer, why the scan?

It's to even the playing ground. Because a lot of the time, makeup instructions are written by makeup fanatics for makeup fanatics. I mean, I love MakeupAlley, but with all the talk about the back wedge,  tightlining, and waterlining, those women aren't speaking English.  If you aren't all makeup, all the time, you won't know what they're talking about.

Even makeup fanatics who write books forget to talk down to their readers. Where's Makeup for Dummies when you need it?

But Gentle Reader(s), this is Makeup for Dummies. And I promise, I'll never forget to talk down to you.

So check out this map. Study it. Learn the terminology. Refer back to it. Copy it onto the top of your left hand with a Sharpie. Tattoo it to the small of your back. Be the ball, Danny.

And get ready for Eye Shadow 101.